Vuejs(QuasarFramework) + Firebaseでウェブアプリをデプロイする
概要
Vuejs + Firebaseで、ウェブアプリをデプロイするチュートリアル記事を書きました。 Vuejs には、様々なフレームワークがありますが、今回は、QuasarFrameworkをチョイスしました。 QuasarFrameworkは、ネイティブアプリ風なデザインがわりと簡単に実装できますので、PWAなんかに便利かなーと思って最近よく使っています。
環境
参照リンク
Quasar Framwork公式サイト: https://quasar-framework.org/
Firebase公式サイト: https://firebase.google.com/docs/hosting/deploying?hl=ja
Vuejsと、QuasarFrameworkの設定
quasar-cliと、vue-cliをinstallします。
# yarnを使う場合(推奨!)
$ yarn global add vue-cli
$ yarn global add quasar-cli

# or

# npmを使う場合
$ npm install -g quasar-cli
$ npm install -g vue-cli
quasar-cli で、QuasarFrameworkの新規プロジェクトを作成します。
# quasar init <プロジェクト名>
$ quasar init quasar-firebase

# 以下のように質問事項が出てくるので、適当に設定していく

? Project name (internal usage for dev) quasar-firebase
? Project product name (official name) Quasar App
? Project description A Quasar Framework app
? Author xxxxx <xxxxxxxxxxxx@xxxx.com>

# プロジェクトに必要なオプションを聞かれます。
# とりあえず、ここでは、ESLintのみにチェックを入れて次に進めます。
? Check the features needed for your project:
❯◉ ESLint
 ◯ Vuex
 ◯ Axios
 ◯ Vue-i18n
 ◯ IE11 support

# ESLintの種類を聞かれます。ここでは、Standardを選択しています。
? Pick an ESLint preset Standard

# Cordova idを聞かれていますが、つかわないので、そのままEnterを押して
# デフォルトのものを設定していただければOKです。
? Cordova id (disregard if not building mobile apps) org.cordova.quasar.app

# nodejsのpackageの管理に、yarn か、npmどちらを使うかを聞かれます。
# 特に理由がなければyarnを選択しましょう。
? Should we run `npm install` for you after the project has been created? (recom
mended) yarn
開発サーバーで起動します。
# プロジェクトフォルダに移動する。
$ cd quasar-firebase

# 開発サーバーでの起動
$ quasar dev

# themeをiosにする場合
$ quasar dev -t ios
localhost:8080で、以下のような画面が表示されていれば成功です!

Firebaseのプロジェクトの作成・設定
Firebaseのコンソール画面にログインします。
https://console.firebase.google.com/ にアクセスします。
※コンソールへのログインは、googleアカウントが必要です。
プロジェクトを作成します。
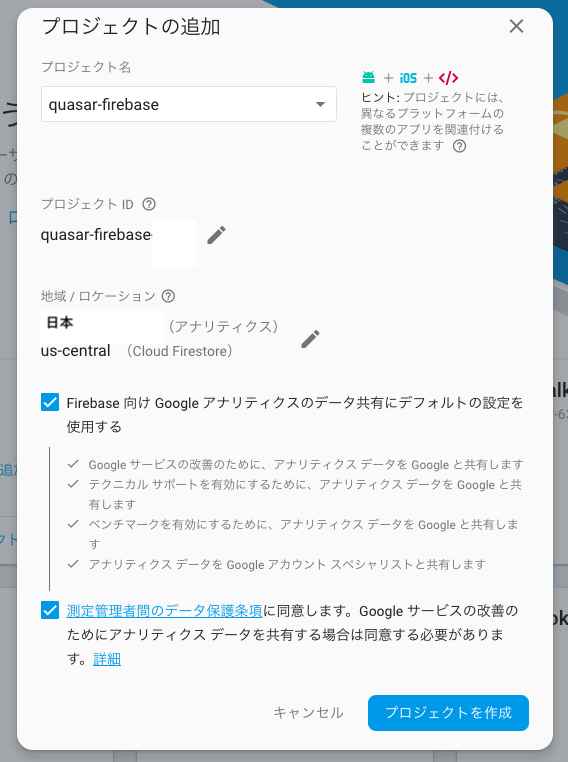
Firebaseのコンソール画面で、「プロジェクトを追加」をクリックすると、プロジェクト作成画面になります。

- プロジェクト名: 任意のプロジェクト名を入力
- プロジェクトID: こちらは、プロジェクト名を決めると自動で生成されます。変更も可能です。他と被ってなければなんでもOKです。
- 国/地域: 日本 を選択します。
- Cloud Firestore のロケーション: us-central のままでいいと思います。現時点では、日本のregionはないみたいなので。
- チェックボックス2つ: 両方をチェック入れます。
上記を設定した上で、プロジェクトを作成をクリックすると、数十秒で、プロジェクトが作成されます。 作成したプロジェクト名は覚えておきましょう。あとで、デプロイのときに使います。

Firebaseへのデプロイ
QuasarFrameworkのデプロイ用のファイルをBuildします。
# 今回は、ios のthemeを指定してbuildしてみます。
$ quasar build -t ios
dist/spa-ios/というフォルダが作成されてその中にデプロイに必要なファイルが作成されています。
firebase-toolsをインストールします。
$ yarn global add firebase-tools
# or
$ npm install -g firebase-tools
ターミナルからFirebaseにログインします。
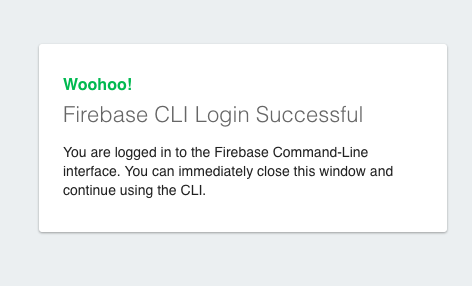
$ firebase login
? Allow Firebase to collect anonymous CLI usage and error reporting information? Yes
# yesを打ち込むと、ブラウザが開いて、google アカウントの一覧が表示されます。
# さきほどプロジェクトを作成したアカウントでログインしましょう。

Visit this URL on any device to log in:
https://accounts.google.com/o/oauth2/auth?client_id=....

Waiting for authentication...

✔  Success! Logged in as xxxxxxxxxx@gmail.com


※すでにログイン済みの場合は、ログアウトしてから、再度ログインし直します。
$ firebase login
Already logged in as xxxxxxxxxx@gmail.com
$ firebase logout
✔  Logged out from xxxxxxxxxx@gmail.com
firebase の初期設定をします。
$ firebase init

######## #### ########  ######## ########     ###     ######  ########
##        ##  ##     ## ##       ##     ##  ##   ##  ##       ##
######    ##  ########  ######   ########  #########  ######  ######
##        ##  ##    ##  ##       ##     ## ##     ##       ## ##
##       #### ##     ## ######## ########  ##     ##  ######  ########

You're about to initialize a Firebase project in this directory:

  /Users/(プロジェクトフォルダのpathが表示されます。)

# Firebaseでの用途を聞かれるので、Hostingを選択します。(space key で、移動できます)
? Which Firebase CLI features do you want to setup for this folder? Press Space to select features, then Enter to conf
irm your choices. (Press <space> to select)
 ◯ Database: Deploy Firebase Realtime Database Rules
 ◯ Firestore: Deploy rules and create indexes for Firestore
 ◯ Functions: Configure and deploy Cloud Functions
❯● Hosting: Configure and deploy Firebase Hosting sites
 ◯ Storage: Deploy Cloud Storage security rules

=== Project Setup

First, let's associate this project directory with a Firebase project.
You can create multiple project aliases by running firebase use --add,
but for now we'll just set up a default project.

# どのプロジェクトにHostingするか聞かれます。
# 先程作成したプロジェクトを選択しましょう。
? Select a default Firebase project for this directory:
  ...
  ...
  ...
❯ your-project-id (quasar-firebase)
  ...

i  Using project your-project-id (quasar-firebase)

=== Hosting Setup

Your public directory is the folder (relative to your project directory) that
will contain Hosting assets to be uploaded with firebase deploy. If you
have a build process for your assets, use your build's output directory.

# Hostingのセットアップを聞かれます。
# ここは、あとで、設定ファイルから修正するので、取り急ぎすべてデフォルトのままでセットアップします。
? What do you want to use as your public directory? public
? Configure as a single-page app (rewrite all urls to /index.html)? No
✔  Wrote public/404.html
✔  Wrote public/index.html

i  Writing configuration info to firebase.json...
i  Writing project information to .firebaserc...

✔  Firebase initialization complete!
firebase.jsonを修正します。
$ firebase initを実行すると、フォルダ内に、firebase.jsonが作成されていると思います。
firebase.jsonのpublicの内容を修正します。
# firebase.json
{
  "hosting": {
    # public の箇所に、quasar-cliでBuildされたファイルのpathを指定します。
    "public": "./dist/spa-ios",
    "ignore": [
      "firebase.json",
      "**/.*",
      "**/node_modules/**"
    ]
  }
}
firebase にデプロイします。
$ firebase deploy

=== Deploying to 'your-project-id'...

i  deploying hosting
i  hosting[your-project-id]: beginning deploy...
i  hosting[your-project-id]: found 23 files in ./dist/spa-ios
✔  hosting[your-project-id]: file upload complete
i  hosting[your-project-id]: finalizing version...
✔  hosting[your-project-id]: version finalized
i  hosting[your-project-id]: releasing new version...
✔  hosting[your-project-id]: release complete

✔  Deploy complete!

Project Console: https://console.firebase.google.com/project/your-project-id/overview
Hosting URL: https://your-project-id.firebaseapp.com
これでデプロイは完了です。お疲れ様でした! Hosting URLにアクセスするとQuasarFrameworkの初期設定のページ表示されていると思います。

